|
| I bought my oldest son a 16 inch GT Jr Performer to fix up as his first full-blown freestyle bike. This bike dates back to around 1991 or 92, so it needed some work. This is kinda a "how-to" on how I fixed it up. Enjoy |
|
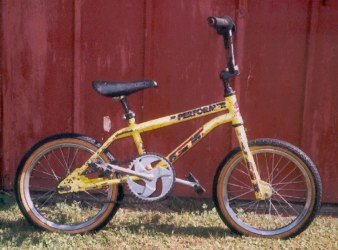
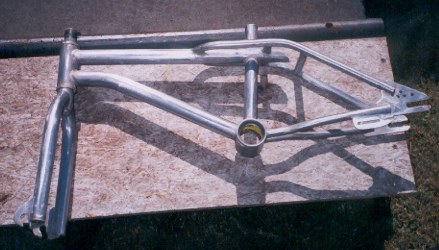
| Here is the bike in the condition I bought it. It had a yellow with black splats paint job. I already see areas that will get upgraded; like the coaster brake hub to a freewheel, a "drain pipe" seat post, and hand brakes. |
|
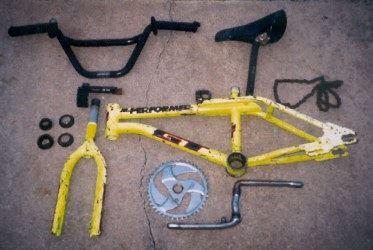
| Step 1 Taking it Apart: I removed all the parts so that the paint could be stripped off. I couldn't get the bottom bracket cups out, so I just left them in to be painted. |
|
| Step 2 Paint Stripping: Next I sprayed all the painted areas with paint stripper. I strongly recommend using BIX paint stripper. Don't worry about the stickers, BIX will strip them off. |
|
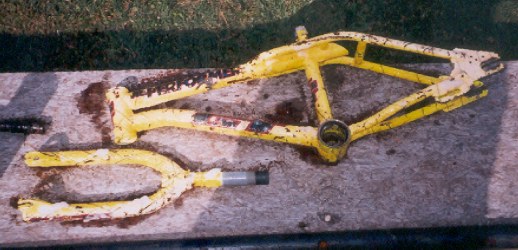
| Step 3 Sand the Metal: Here are the handlebars, frame & fork all stripped down. Lightly sand the metal with medium sand paper. |
|
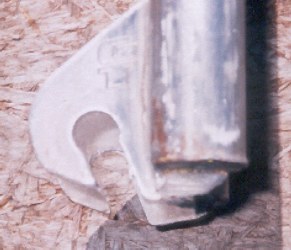
| These pics are a bit out of focus, but you can make out the "GT" logo stamped into the fork blade and pierced top tube. This was the way to tell a genuine "GT" from knock-offs like a Huffy Sigma. |
|
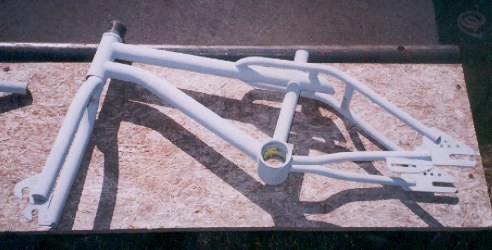
| Step 4 Primer: I have a small metal shed in my back yard that I painted all the parts in. That way I didn't have to worry about the wind and over spray. I let the primer dry 24 hrs, then put all the primed parts into my van for a couple of days to let the heat "cure" the paint. Paint dries from the outside in, so you need to give the paint a few days to fully dry. |
|
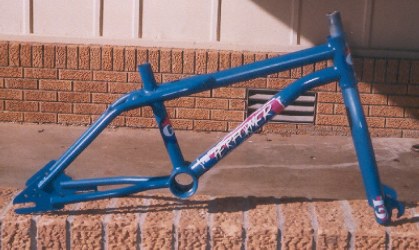
| Step 5 Paint: I decided to go with a blue and black color scheme for the bike. My son has been telling me he wants a blue bike. So, again I painted all the parts in my shed to avoid over spray & the wind. I let the parts dry in my shed 24 hrs, then put them in my van for a few days to let the paint "cure". I took about of week and a half to prime and paint the bike to make sure the paint was good and "cured". Bike companies, today, don't have to worry about this; because all parts are powder coated and baked on. |
|
| I knew there was no way of finding a vintage "GT Jr Performer" sticker pack, but luckily Tony Carruth had some old "GT Pro Performer" frame sticker packs! My wife was worried that my son wouldn't like the pink in the sticker. So I just showed him the stickers without telling him what they were for, and asked him if he liked them; he said they were "cool". So, I put the sticker pack on the frame. Then I painted the frame, fork, bars, & seat post with a gloss clear coat. The enamel paint didn't seal the stickers like I thought, so, I will probably go over these parts with a gloss polyurethane before I put the bike together. |
|
| I was also able to get an old Dyno "Drain Pipe" seat post from Tony Carruth. The bike needs a layback or "drain pipe" seat post so the bars don't hit the seat. You can see the original purple color of the seat post. The reason I didn't paint the entire post is because a lot of the straight section will need cut off. |
|
| A customer of mine gave me a Wal-Mart Mongoose bike that was laying at his job sight. I was able to gets some good parts off of it for the 16 inch GT. Namely, front & back caliper brakes, brake levers, 1 inch SST Oryg, a better stem and good pedals. Tony Carruth also gave me a old GT Freestyle seat, but its kinda rough looking. So, the only things left to get are a new seat, tires, grips, and a 16" wheel with a freewheel hub. Check back soon for pictures of the completed bike. |
|
|
|